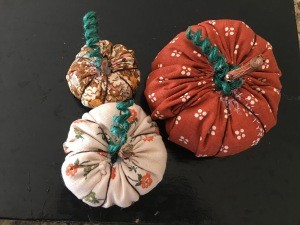
 'Tis the season for pumpkins (almost)! A great way to use up excess fabric pieces for a beautiful fall decoration.
Total Time: 20 minutes
Yield: 1
Supplies:
- large fabric scraps
- long doll needle and regular sewing needle
- heavy duty thread
- thread
- scissors
- pins
- sewing machine
- stuffing
- twig for top of pumpkin
Steps:
- Cut a rectangle piece of fabric twice the length as the width of the fabric. I have two sizes shown below. Fold in half, right sides together, and pin the short ends. Sew a seam along the short ends.
- Turn right side out. With a sewing needle and thread doubled with a knot at the end, baste along the raw edges of the long side to the end. Pull and gather the large basting stitches together to form a ruffle. Whip stitch the end and knot. Using the remainder of the thread, sew the two short edges together to close the opening. Repeat the step for the other side. Push stuffing through the opening.
- Using heavy duty black thread, insert a doll needle at the bottom opening of the pumpkin and bring up through the middle of the pumpkin to the top. Then, working on the outside of the pumpkin, pull the thread from the top along the sides to the bottom opening of the pumpkin and repeat until you have six segments created.
- For the finishing touches, hot glue a twig for the top of the pumpkin. I also added a curlicue near the twig. (To make the curlicue, I wrapped yarn around a skewer, soaked it in water for 5 minutes, and baked in the oven for 20 minutes at 250 degrees.)
Add your voice! Click below to comment. ThriftyFun is powered by your wisdom!

 'Tis the season for pumpkins (almost)! A great way to use up excess fabric pieces for a beautiful fall decoration.