social

Pumpkin Garland


Diamond Post Medal for All Time! 1,298 Posts

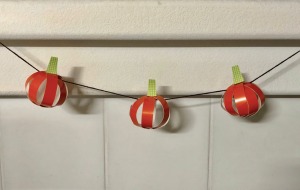
Pumpkin Garland - three paper pumpkins on yarnHere is a simple and easy to make pumpkin garland for fall and Halloween. It is perfect for decorating your fireplace area, or to use as table, party, or home decorations.

Advertisement

The pumpkins, I made from recycled orange cardboard packaging from a photo company I where had my photos printed. (Shutterfly) The rest of the supplies I already had at home.

Total Time: 45 minutes

Supplies:
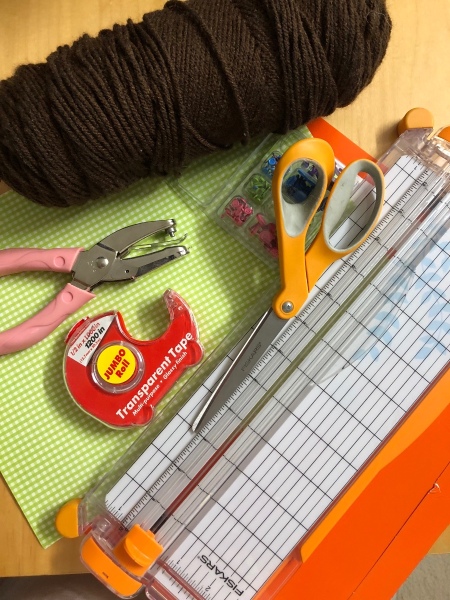
Pumpkin Garland - supplies
 

Steps:

  1. I recycled Shutterfly's packaging to make the strips for my pumpkin. You can use orange paper. I cut 1" x 6" strips. For each pumpkin, it is up to you how many strips you want. The more strips, the fuller the pumpkin will be. I experimented with 6 and 8 strips per pumpkin.
  2. Pumpkin Garland - using paper cutter to make orange strips
     
    Pumpkin Garland - strips cut to 6 inch lengths
     
    Pumpkin Garland - pile of orange paper strips
     
  3. Using a smaller hole puncher (not standard or the hole would be too big), punch the top and bottom.
  4. Pumpkin Garland - punch a small hole at the top and bottom of the strips
     
    Pumpkin Garland - strips with holes punched
     
    Advertisement

  5. Add strips to the brad and secure brad in place.
  6. Pumpkin Garland - green brad
     
    Pumpkin Garland - begin adding strips to the brad
     
    Pumpkin Garland - 4 strips on the brad
     
    Pumpkin Garland - stopped at 8 strips
     
    Pumpkin Garland - flatten the wings of the brad
     
  7. For the stem of the pumpkin, I used a plaid green/white paper. I cut a 1" strip and folded it in half (so the front and back of the paper is both plaid). Then, I used my scissors to freehand cut a stem. I folded up the stem at the wide end, and then punched a hole.
  8. Pumpkin Garland - cutting a strip of green plaid paper
     
    Pumpkin Garland - fold with pattern out
     
    Pumpkin Garland - cut a stem shape
     
    Pumpkin Garland - fold under a small section and punch a hole
     
  9. Now insert another brad into the stem we just made, and curve over the pumpkin strips onto the brad. Repeat until all strips are on the brad and secure.
  10. Pumpkin Garland - insert a brad into the stem
     
    Pumpkin Garland - start folding up the pumpkin strips and inserting the end on the brad
     
    Pumpkin Garland  - side view of assembly
     
    Pumpkin Garland - top view with 3 orange strips attached
     
    Pumpkin Garland - same step from the side
     
    Pumpkin Garland - all strips on the brad, secure
     
    Pumpkin Garland - finished
     
    Advertisement

  11. Repeat until you have the amount of pumpkins you want to make.
  12. Then I threaded brown yarn through the pumpkins. You can tape them in place on the yarn. They were now ready to hang over my fireplace.
  13. Pumpkin Garland - finished pumpkins and skein of yarn
     
    Pumpkin Garland - closeup of yarn through the pumpkin
     
    Pumpkin Garland - making garland
     
    Pumpkin Garland - thread the yarn through the pumpkins
     
    Pumpkin Garland - hanging on mantle
     

Add your voice! Click below to comment. ThriftyFun is powered by your wisdom!


Diamond Post Medal for All Time! 1,246 Posts
October 8, 20180 found this helpful

So cute!


Add your voice! Click below to comment. ThriftyFun is powered by your wisdom!

 
In This Page
Next >︎
Categories
Crafts DecorationsOctober 4, 2018
Pages
More
🌻
Gardening
🐛
Pest Control
👔
Father's Day Ideas!
Instagram
Sub-Categories
AdviceBooksCandyCostumesCraftsDecorationsGamesGhost StoriesHaunted HouseHistoryJokesLinksMake UpMiscellaneousPartiesPartiesPhotosPumpkin CarvingRecipesSafetyTipsTreats
Published by ThriftyFun.
Desktop Page | View Mobile
Disclaimer | Privacy Policy | Contact Us
Generated 2024-05-13 20:17:09 in 7 secs. ⛅️️
© 1997-2024 by Cumuli, Inc. All Rights Reserved.
https://www.myfrugalhalloween.com/Pumpkin-Garland.html