lalala...
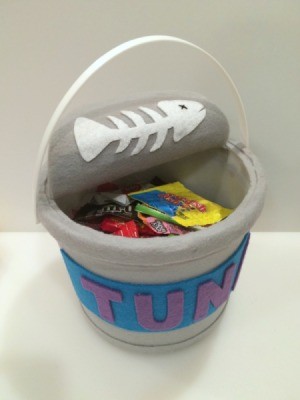
Gold Post Medal for All Time! 899 Posts  My toddler was a kitty for Halloween, so I decided to make him a "tuna can" treat bucket!
Supplies:
- plastic ice cream bucket
- grey felt
- white felt
- various colors of felt for the label
- black embroidery floss
- hot glue gun
- scissors
- crafting knife
- cutting mat
- wire
- thin cardboard, for templates
Steps:
- Cutout a piece of felt a little wider than the bucket and long enough to go all the way around, with a little bit of overlap. Be sure to test fit it. Find the center of the felt and align it with the front center of the bucket, so that the seam will be in the back.
- Apply a little hot glue under the top lip of the bucket and adhere the top edge of the felt. Then smooth the felt down and adhere it at the bottom edge of the bucket.
- Wrap the felt towards the handle and trim away felt so that it wraps around the handle. Apply glue and adhere the felt. Then trim away excess felt at the top lip of the bucket, so that it tucks underneath. Apply glue and adhere the felt. Repeat at the other handle. Be sure to smooth out the felt as you wrap it, at both the top and bottom, applying glue to tack it down.
- Trim the ends straight so that they make a nice seam. Then apply glue and adhere them down the full length of the bucket.
- Turn the bucket upside down and trim away the excess felt.
- Apply additional glue along the bottom edge at any loose spots and press firmly.
- Cut a narrow strip of felt (approx. 3/4 in.) that it long enough to wrap around the bottom edge of the bucket. Attach it at the seam, then glue it as you wrap it around. Trim it, if necessary, at the seam and attach the end.
- Trim any excess felt along the bottom.
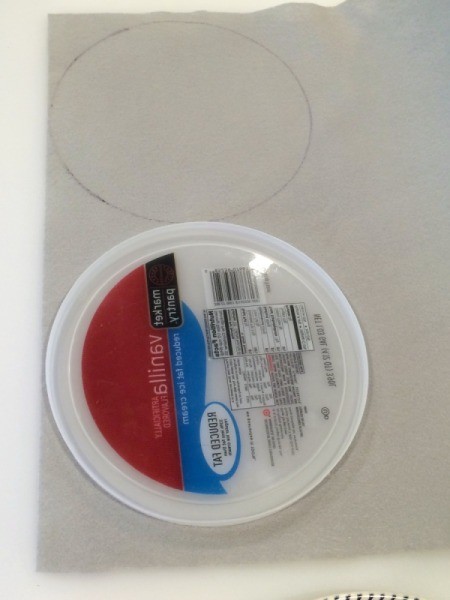
- Trace around the lid to create 2 felt circles. Cut them out and set them aside.

- Use a crafting knife to cut out the center of the lid, about half way around. (See photo)
- Cut a piece of wire a few inches longer than the width of the lid. Create two (2) small holes with the crafting knife, at the back of the lid, where the center is still attached. Insert the end of the wire into hole #1 and bend it to hold it in place. Then glue the wire to the lid, across the entire center area.
- Lay one of the felt circles over the top of the lid, covering the wire. Make a small cut for the wire to come through, then glue the felt in place. Now cut the along where the center of the lid is cut. Glue the felt down along the edge and in the center of the lid.
- Gently roll the center of the lid back, making a nice curl, then feed the end of the wire into hole #2 in the lid. You may need to snip the felt at the hole to get the wire through.
- Create a template for the "lid tab" and cut the pieces out of felt. Glue the small pieces to the front of the tab. Now glue the tab pieces to the back and front of the wire. Pull down any excess wire and curl it at the underside of the lid.
- Adhere the second felt circle to the other side of the lid. Trim away any excess felt along the edges.
- Cut a narrow strip (3/4 in. wide) of felt long enough to wrap around the edge of the lid. Adhere the felt around the side of the lid, then roll it up over the edge to the top, glueing as you go.
- Cut a strip of felt for the "label". Then create templates for the TUNA letters. Cut out the letters and glue them to the label. Attach the label to the bucket.
- Create a template for the "fish bones" and cut it out. Then cut it out of white felt. Glue the fish bones to the lid, as shown below.
- Now your tuna can bucket is ready for trick-or-treating!

Add your voice! Click below to comment. ThriftyFun is powered by your wisdom!

 My toddler was a kitty for Halloween, so I decided to make him a "tuna can" treat bucket!
